Aspia Client
Table of contents
1. Purpose
Allows you to connect to and control Hosts.
2. Installing
Windows x86
  Run aspia-client-2.7.0-x86.msi and follow the instructions on the screen.

Windows x86_64
  Run aspia-client-2.7.0-x86_64.msi and follow the instructions on the screen.

MacOSX x86_64
  Open aspia-client-2.7.0-x86_64.dmg and move “Aspia Client” to “Applications”.

Linux
  sudo apt install ./aspia-client-2.7.0-x86_64.deb
3. Session types
3.1. Desktop manage and view
Allows to connect to a remote computer to interact with desktop (or view desktop).
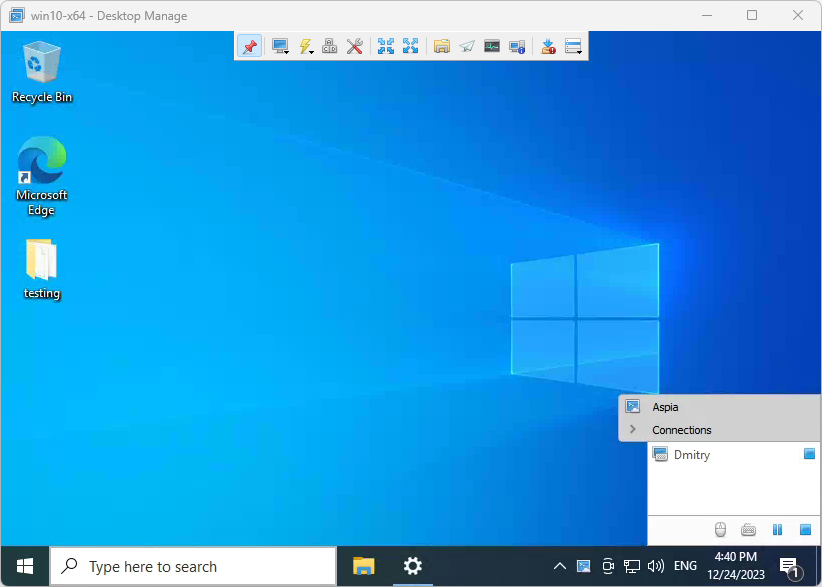
At the top of the desktop control window is a toolbar that allows you to perform a number of actions.

This panel appears when you hover the mouse cursor and hides when the mouse cursor leaves the toolbar area (you can dock the toolbar, then it will be permanently displayed).
The toolbar can be moved around the top of the window. To do this, hold down the right mouse button above the toolbar and move it left or right.
Toolbar buttons
| Name | Description |
|---|---|
 Pin Pin |
If the button is checked, the toolbar will always be displayed. Otherwise, after a few seconds after moving the mouse pointer outside the panel, it will be hidden. |
 Settings Settings |
Invokes the dialog to change session parameters. |
 Screen resolution Screen resolution |
Allows to change screen resolution. |
 Select screen Select screen |
Allows to select the monitor to be displayed. |
 Full desktop Full desktop |
Selecting this option will display all monitors. |
 Power management Power management |
Allows to shut down or restart the computer, end or block a user session. |
 Ctrl+Alt+Del Ctrl+Alt+Del |
Sends Ctrl+Alt+Del key combination to a remote computer. |
 Automatic size Automatic size |
Changes the window size to the optimal one based on the size of the monitors of the remote and local computers. |
 Full screen Full screen |
Switches the control window to full screen or returns the original state. |
| Starts file transfer. | |
 System information System information |
Displays a window with information about the remote computer. |
 Text chat Text chat |
Starts text chat. |
 Task manager Task manager |
Starts task manager. |
 Remote update Remote update |
Runs an application update on a remote computer. Displayed only when the host version is smaller than the Console. |
 Extended menu Extended menu |
Displays an extended menu of advanced features. |
Extended menu
| Name | Description |
|---|---|
| Paste clipboard as keystrokes | Pastes the contents of the clipboard on the remote computer in the form of keyboard key presses. |
| Scale | Allows to change the scaling mode (window filling or specified percentage scale). |
| Automatic scrolling | The contents of the window will automatically scroll as the cursor approaches the window borders. |
| Send key combinations | Enables sending key combinations to the remote computer. |
| Pause video when minimizing | When you minimize the window, video transmission over the network will pause. |
| Pause audio when minimizing | When you minimize the window, audio transmission over the network will pause. |
| Save screenshot… | Allows to save the current remote desktop image to a file. |
| Recording settings… | Allows to configure the path in which the video recording of the session will be saved and enable or disable the automatic start of recording upon connection. |
| Start recording | Starts or stops recording the session to a video file. |
| Statistics | Opens the statistics dialog to view service connection metrics. |
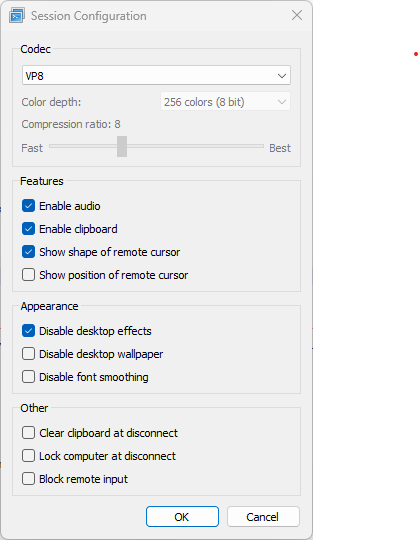
Session settings
In the session settings dialog you can change the parameters used in the current session. These settings only affect the current connection and will not be used for the next one.
3.2. File transfer
Allows to transfer a file between local and remote computers, delete, rename files, create directories. When connected to a remote computer lists of disks are displayed that allow you to estimate the amount of free space on them.
![]()
Hot keys
| Key combination | Description |
|---|---|
| Backspace | Go to parent directory |
| F2 | Rename selected item |
| F4 | View list of disks |
| F5 | Refresh |
| F11 | Send selected item or items |
| Delete | Delete selected item or items |
3.3. System information
Allows to view basic information about the remote computer. The resulting information can be saved to an HTML file or printed out on a printer. Double-clicking on any line with information about the system will be copied to the clipboard. In the context menu, you can selectively copy the name of the parameter, its value or a string in its entirety.
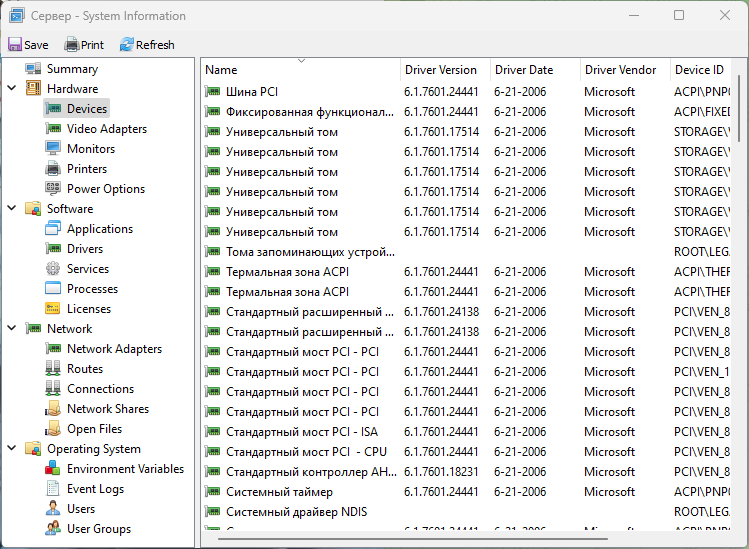
Hot keys
| Key combination | Description |
|---|---|
| Ctrl+S | Save information to file |
| Ctrl+P | Print information on the printer |
| Ctrl+C | Copy current line of information |
| F5 | Refresh |
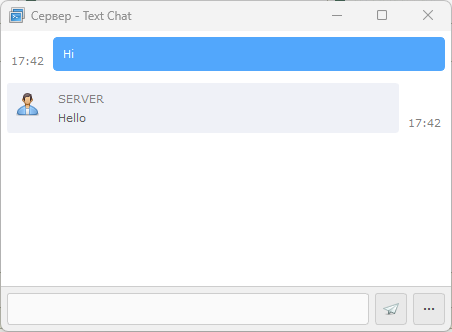
3.4. Text chat
Allows you to open a text chat with a user on a remote computer.
4. Command Line
| Argument | Description |
|---|---|
-? -h --help |
Displays help on command line options. |
-v -version |
Displays version information. |
--address <address> |
Remote computer address or ID. |
--port <port> |
Remote computer port. |
--name <name> |
Display name of host. |
--username <username> |
Name of user. |
--password <password> |
Password of user. |
--session-type <type> |
Session type. Possible values: desktop-manage, desktop-view, file-transfer, system-info, text-chat. |
--codec <codec> |
Type of codec. Possible values: vp8, vp9, zstd. |
--color-depth <value> |
Color depth. Possible values: 3, 6, 8, 16, 32. |
--compress-ratio <value> |
Compression ratio. Possible values: 1-22. |
--audio <value> |
Enable or disable audio. Possible values: 0 or 1. |
--cursor-shape <value> |
Enable or disable cursor shape. Possible values: 0 or 1. |
--cursor-position <value> |
Enable or disable cursor position. Possible values: 0 or 1. |
--clipboard <value> |
Enable or disable clipboard. Possible values: 0 or 1. |
--desktop-effects <value> |
Enable or disable desktop effects. Possible values: 0 or 1. |
--desktop-wallpaper <value> |
Enable or disable desktop wallpaper. Possible values: 0 or 1. |
--font-smoothing <value> |
Enable or disable font smoothing. Possible values: 0 or 1. |
--clear-clipboard <value> |
Clear clipboard at disconnect. Possible values: 0 or 1. |
--lock-at-disconnect <value> |
Lock computer at disconnect. Possible values: 0 or 1. |
--block-remote-input <value> |
Block remote input. Possible values: 0 or 1. |
--router-address <address> |
Router address. |
--router-port <port> |
Router port. |
--router-username <username> |
Router name of user. |
--router-password <password> |
Router password of user. |
5. Environment variables
- ASPIA_NO_VERIFY_TLS_PEER - If the variable is declared, then the validity of the TLS certificate is not checked when checking for updates. It is not recommended to declare this variable unnecessarily. Declaring this variable can help solve the problem with checking for updates in Windows 7/2008R2, where root certificates are not updated.
6. Logs
To configure the Router logging parameters, use the following recommendations:
- To set the log level, declare an environment variable ASPIA_LOG_LEVEL with a value from 0 to 2. Decreasing the value increases the number of messages in the log.
- To enable logging to a file (if it is not enabled by default for platform), declare environment variable ASPIA_LOG_TO_FILE with a value other than 0. If the environment variable is declared with a value of 0, then logging to file will be disabled.
- To enable logging to stdout (if it is not enabled by default for platform), declare environment variable ASPIA_LOG_TO_STDOUT with a value other than 0. If the environment variable is declared with a value of 0, then logging to stdout will be disabled.
- Log files can have a limited size and after reaching the maximum file size a new log file will be created. By default, the maximum log file size is limited to 2 MB. If you need to change this size, then declare environment variable ASPIA_MAX_LOG_FILE_SIZE with a numeric value in bytes. The variable can take a value from 1024 (1 KB) to 10485760 (10 MB).
- By default, log files older than 14 days are automatically deleted. If you want to change this value, then declare environment variable ASPIA_MAX_LOG_FILE_AGE with a numeric value in days. The variable can take a value from 0 to 366. If the variable is set to 0, then the log files will not be automatically deleted.
The log file for Windows is located in the following path:
C:\Users\<user_name>\AppData\Local\Temp\aspia\aspia_client-*.log
For Linux and MacOS:
Logs are written to the terminal.